The Red Special

The Story Of The Home Made Guitar That Rocked Queen And The World

  • Home
  • Book Info
  • News
  • Press

Exclusive – The Red Special Film Props

1st June 2018 By Simon Bradley

The long-awaited 20th Century Fox Queen biopic Bohemian Rhapsody is ready to rock (you…) and, with a release date of 2 November 2018, issues surrounding its somewhat laboured production have faded in the glare of the admittedly excellent trailer that dropped just a few weeks ago.

If you’ve somehow missed the trailer you can enjoy it (yet again) here.

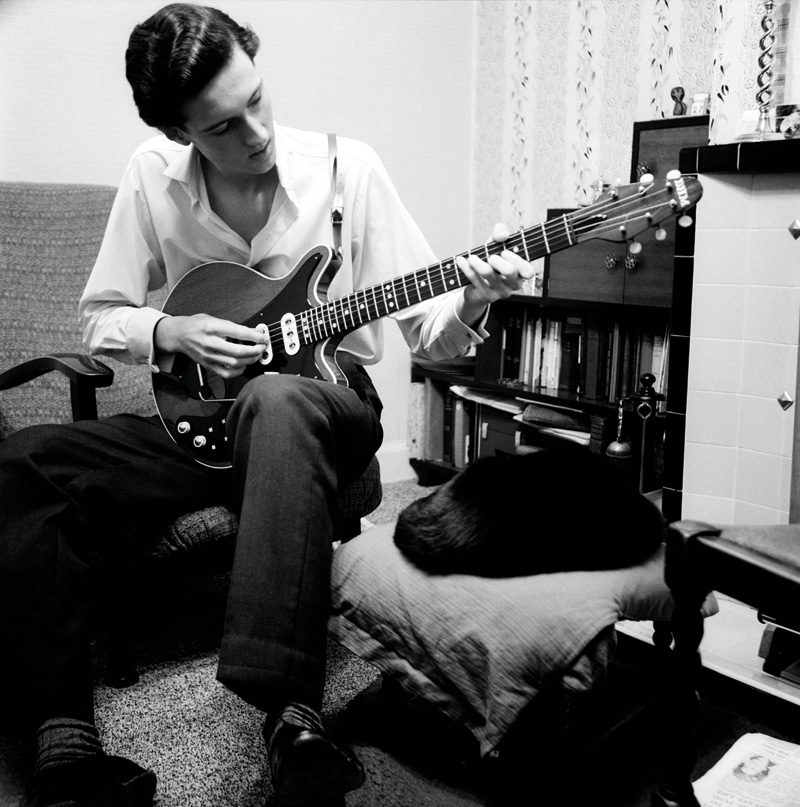
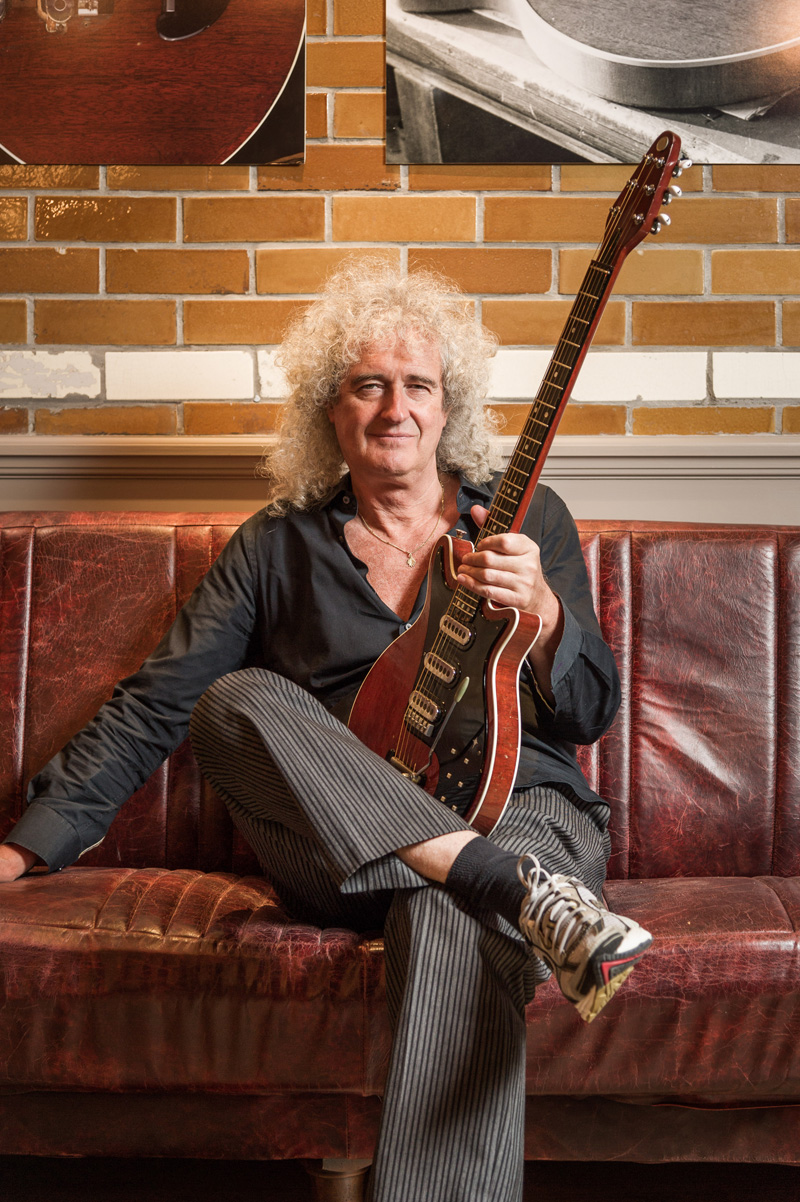
According to IMDB.com it’s… ‘a chronicle of the years leading up to Queen’s legendary appearance at the Live Aid concert in 1985…’ and, with casting for the actors who are playing the four band members completed and announced in early 2017, guitarist Brian May has been sharing images and video clips to whet the appetite of the fans ever since.

The trailer, although perhaps understandably concentrating on actor Rami Malek in his guise as Freddie Mercury, also shows fleeting glimpses of Gwilym Lee, who’s playing Brian, on various stages with a Red Special in his hands. Whilst obviously not the original, online discussion forums and chat rooms have been chewing over what the guitar might have been and who’d made it, and, while the identity of the luthier in question was hardly a huge secret, details have been scant until now.

In a TheRedSpecial.com exclusive we caught up not only with Brian himself, but also the creator of two guitar props for the film, the indomitable Andrew Guyton, to get the full story.

Words by Simon Bradley.

The interview with both Brian and Andrew took place in October 2017.

All images (c) Guyton Guitars. Used with permission. All rights reserved. Do not redistribute.

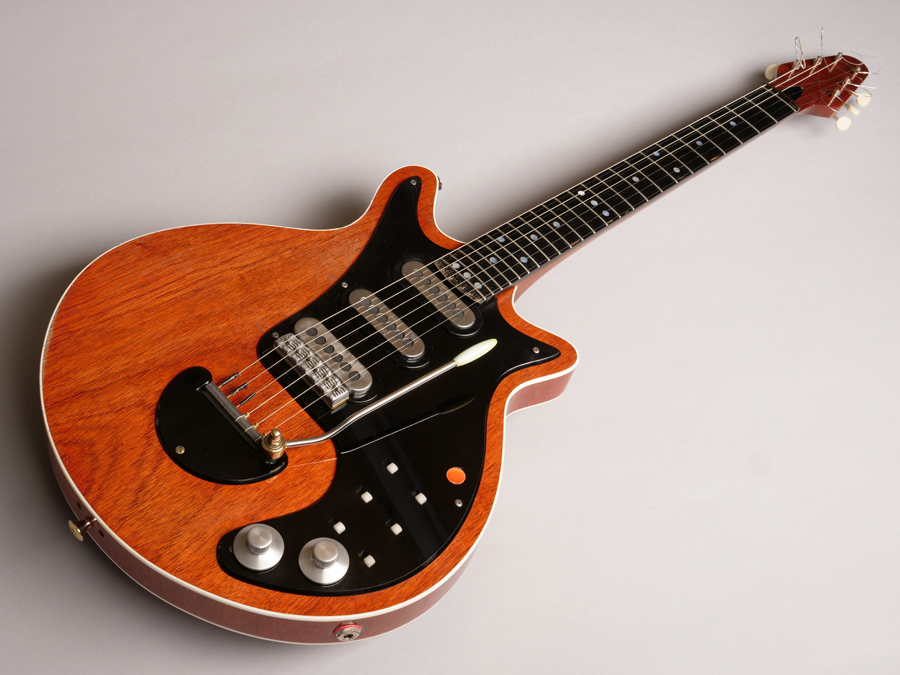
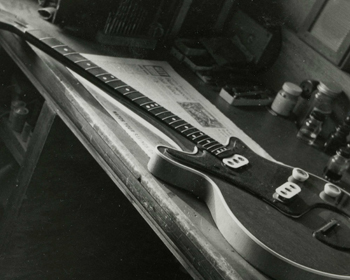
The seventies-period RS prop. Image (c) Guyton Guitars

RS.com: Please tell us about the guitars that are being used in the film

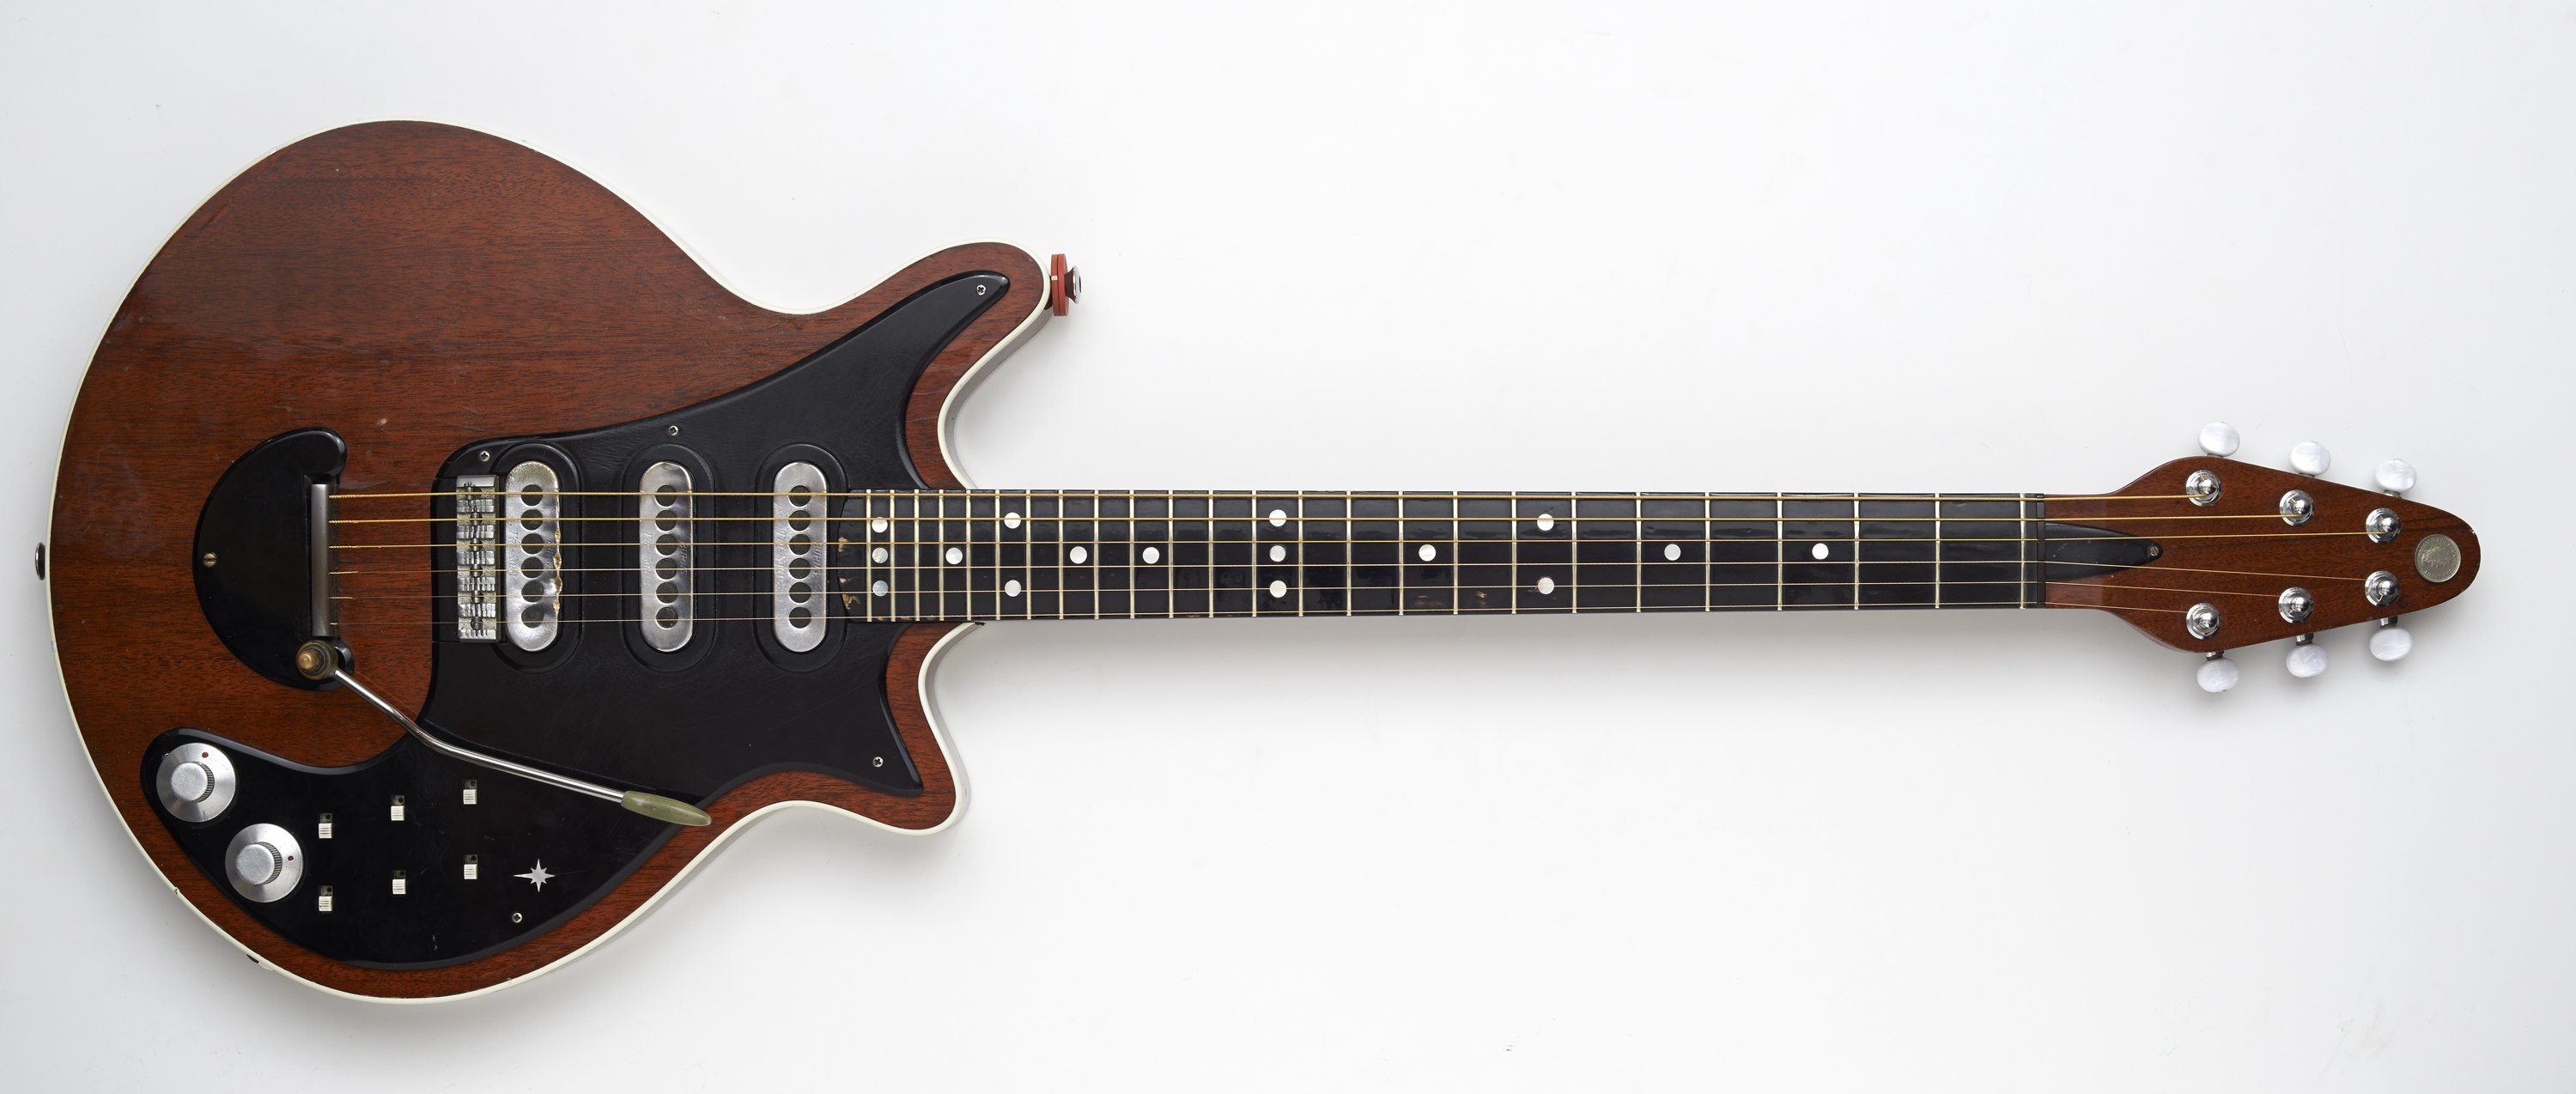
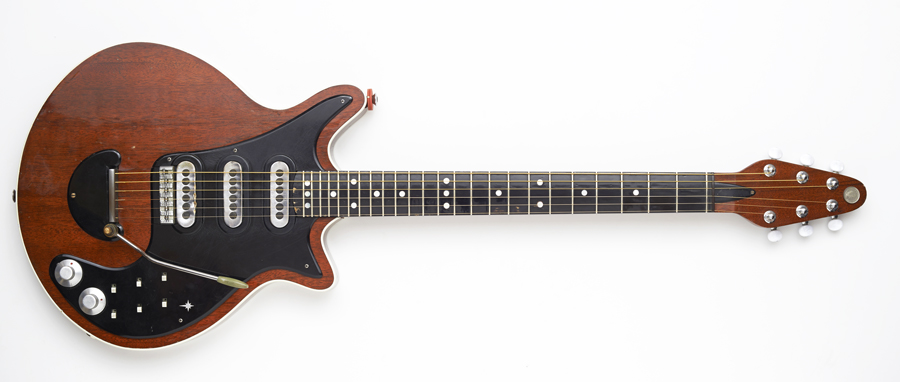
Brian May: Andrew Guyton was asked to make guitar props for the film and he’s made, I think, two different guitars that represent my Red Special from the past. One’s for Live Aid and the other’s for Madison Square Garden in the seventies, and he’s made them absolutely faithfully to the appearance and condition of the guitar at those moments: it’s uncanny to see it. Times when it had bits of tape holding it together, times when the fretboard was all worn down and had lost some of its colour, and lots of damage to the body, and he’s reproduced everything in the finest detail.

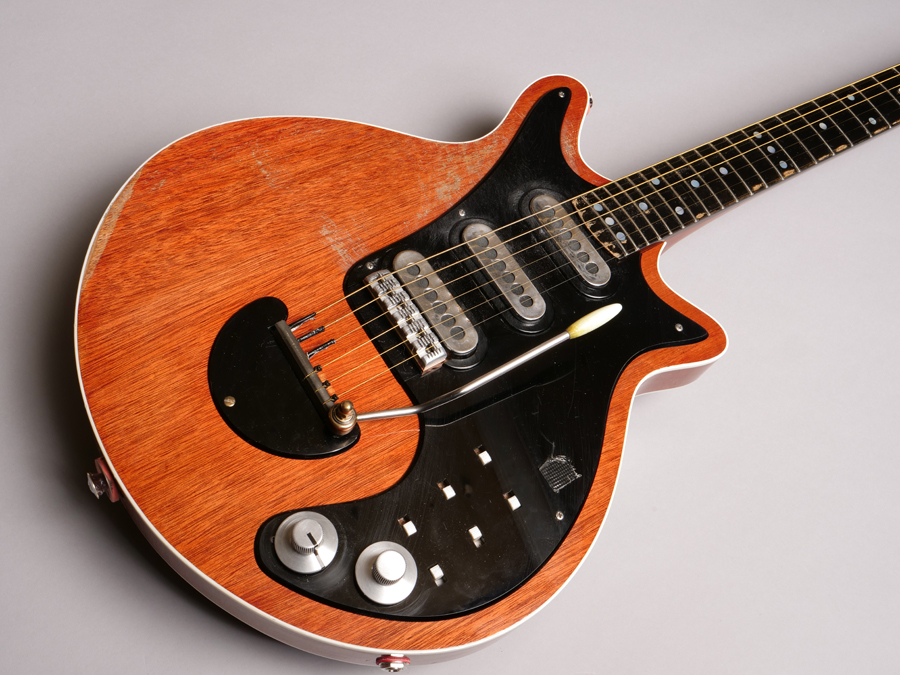
The Live Aid-era RS prop. Image (c) Guyton Guitars

Andrew Guyton: They emailed me saying they needed some props for the film, but they didn’t really know what they should do. At the beginning they thought they would modify some BMG Supers, but they asked me if I could build three in three weeks. That was the initial idea but I just told them that it simply couldn’t be done in that time. After quotes and a bit of backwards and forwards we agreed that I should build two, one from the Bohemian Rhapsody recording era and another from Live Aid. We tackled that one first and it took two weeks – in fact they each took two weeks to build – but they were both done in time!

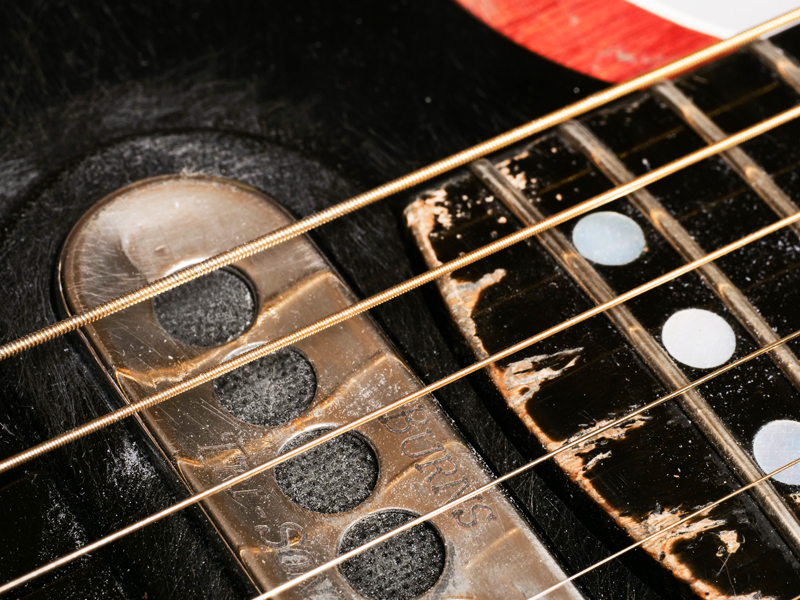
The neck pickup and fingerboard from the Live Aid-era RS. Image (c) Guyton Guitars

RS.com: Presumably they have the period-correct playing marks and wear patterns…

BM: The one that Gwilym, who’s playing me in the film, is using at the moment to do the Rockfield period has a little piece of red paper from Rymans over the hole that used to house the fuzzbox. He’s doing the scene where I’m recording the Rhapsody solo – I probably shouldn’t be telling you this! – and Freddie’s listening and commenting. I used to coil the strings around the machineheads and he’s reproduced that, and the exact amount of distress the fretboard and body had. It’s amazing.

The neo-legendary ‘red dot’… Image (c) Guyton Guitars

AG: I tried to get the ageing as close as I could given the timeframe. You just think of what the guitar goes through and what impact that has on it, like the forearm: you get gradual wear there. Obviously there’s a lot of sixpence damage and putting 30 years worth of damage into a guitar is quite tough. I used a wire brush into a drill to keep the sweep going and whacked the hell out of it, strummed it good and hard, with a fifty pence piece.

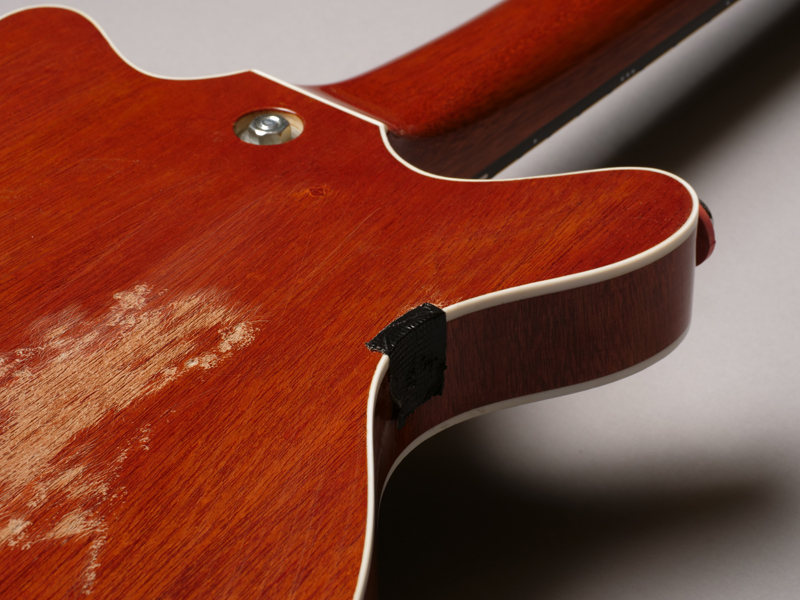
Wear on the rear of the Live Aid-period prop. Note the piece of tape securing the binding. Pic (c) Guyton Guitars

RS.com: What reference material did you use?

AG: We went through all the pictures we could find and we had help from Greg Brooks and the [Queen] archive. He sent me a lot of images, especially of the seventies one as although there are quite a few pictures floating around, not many have any detail. One of the things we really got stuck on was the indicator on the volume knob [of the Live Aid-era prop]; it seemed to change every few years.

The Live Aid-era prop’s volume pot. Image (c) Guyton Guitars

RS.com: Were there any other issues?

AG: The tuners on the seventies one were a major problem; trying to find those online was a nightmare. So I spoke to [fellow luthier] Martyn Booth to see if he had any in his parts bin and he basically donated the ones off his first guitar. He was sure, so fair enough. They were ‘six in line’ so we had to modify three of them to turn them the other way, which wasn’t as bad as I thought it was going to be. It’s fiddly, but you approach it in the right way: I literally couldn’t do anything else for the tuners. It’s not like it has to be road-worthy, they just have to hold in tune and not fall off!

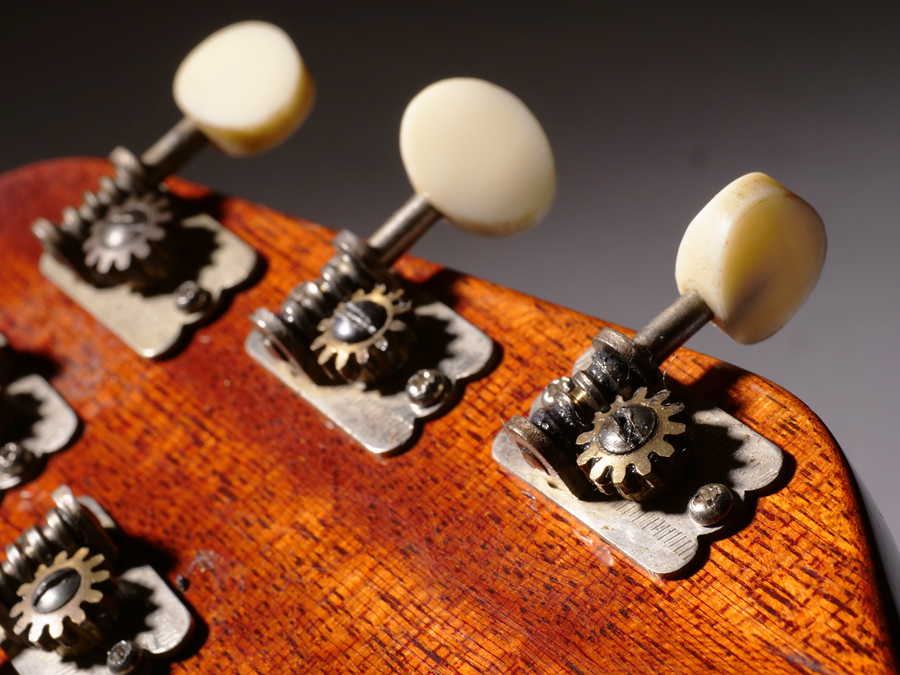
A close-up of the customised tuners fitted to the seventies-era RS prop. Image (c) Guyton Guitars

AG: The machineheads for the Live Aid version were like the old design Schaller M6s, and I wasn’t sure where I could get some of those from. I looked in the workshop and I’ve got an old Gibson Melody Maker that had been modified with these exact tuners, so we used those.

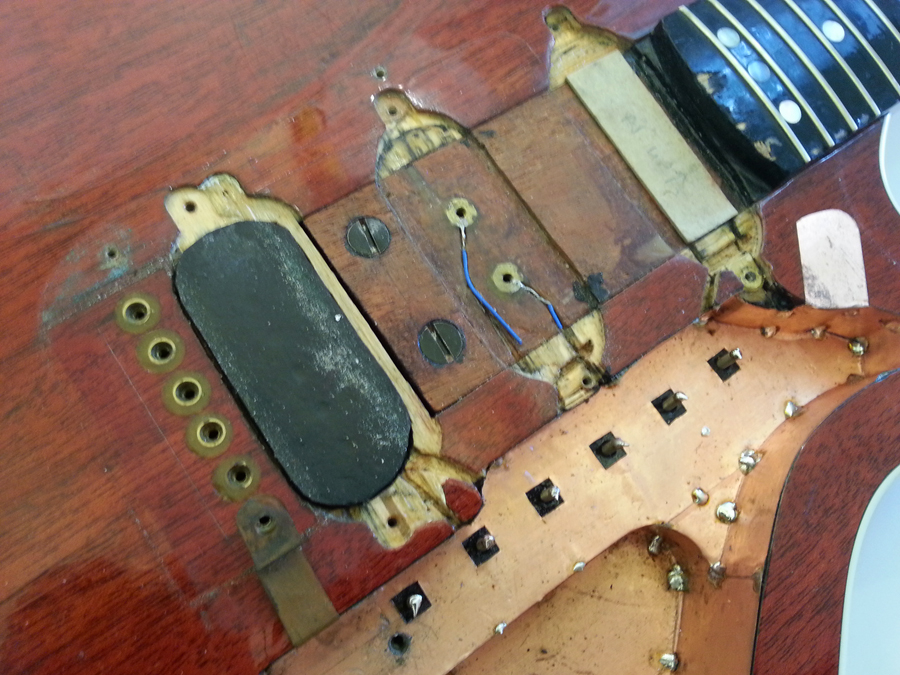
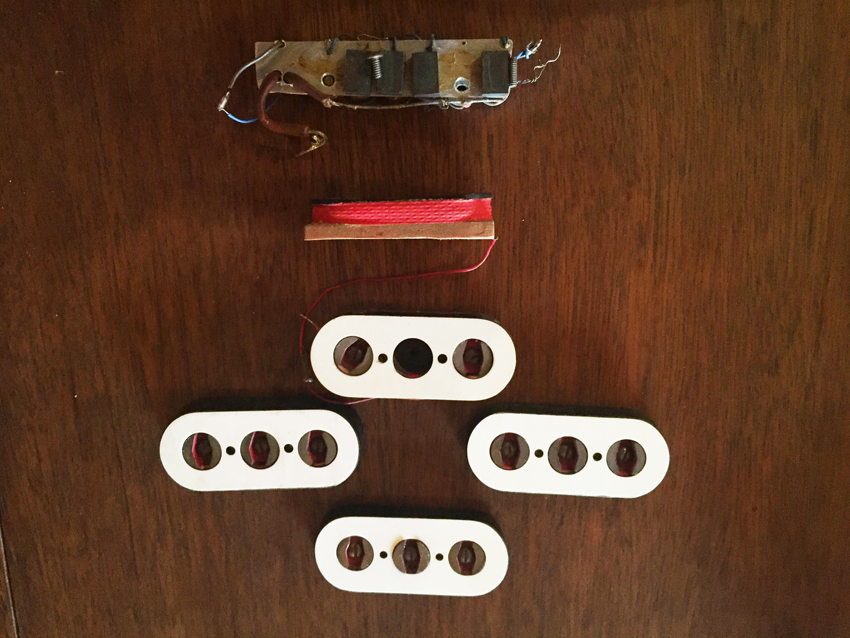
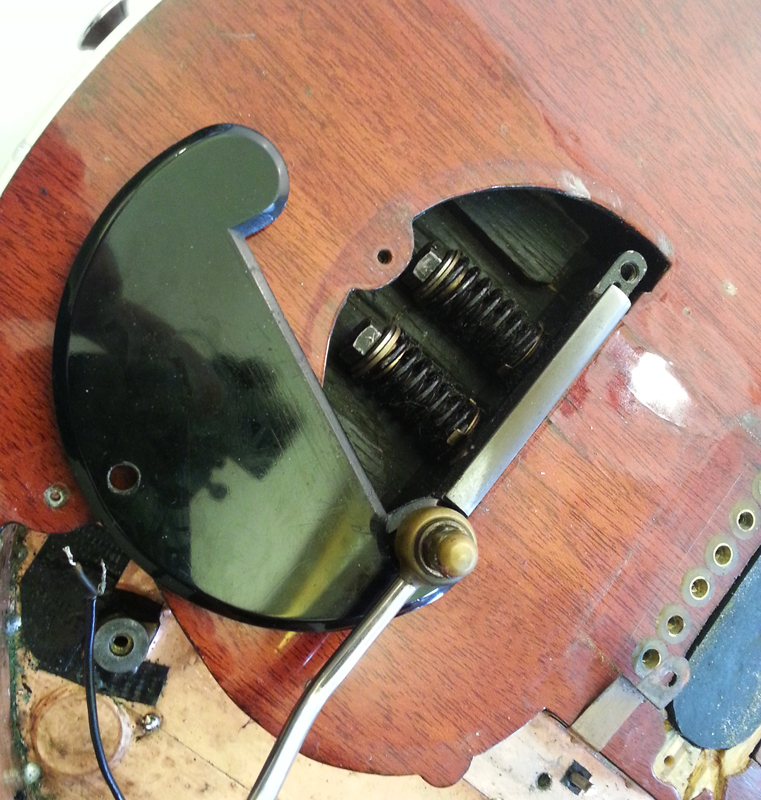
The one of the props in a state of undress. Image (c) Guyton Guitars

RS.com: How close is the construction of the props to that of the original Red Special?

AG: The necks are mahogany with oak fingerboards and the only reason I used [those materials] was that I already had the fingerboards made for the Transporters. That saved a lot of time. The bodies are plywood, just laminated up then veneered and bound like the real thing, and finished in the Rustins plastic coating.

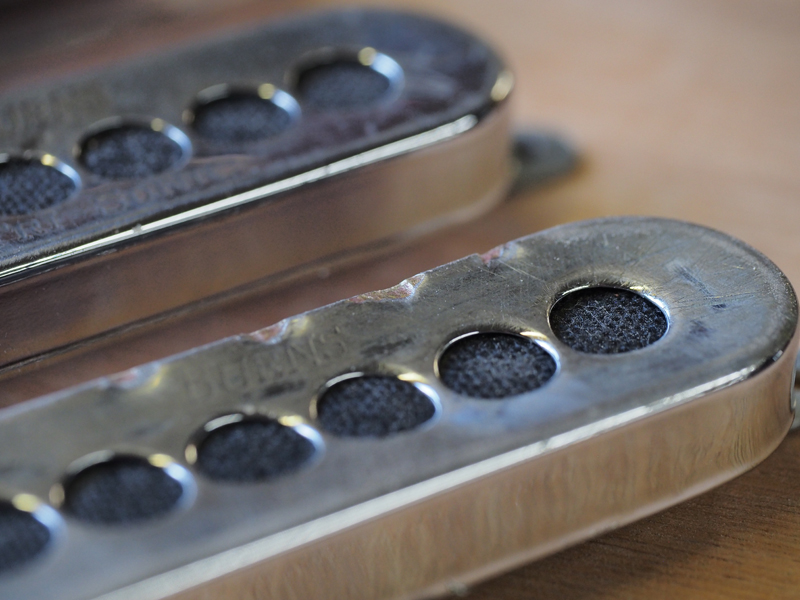
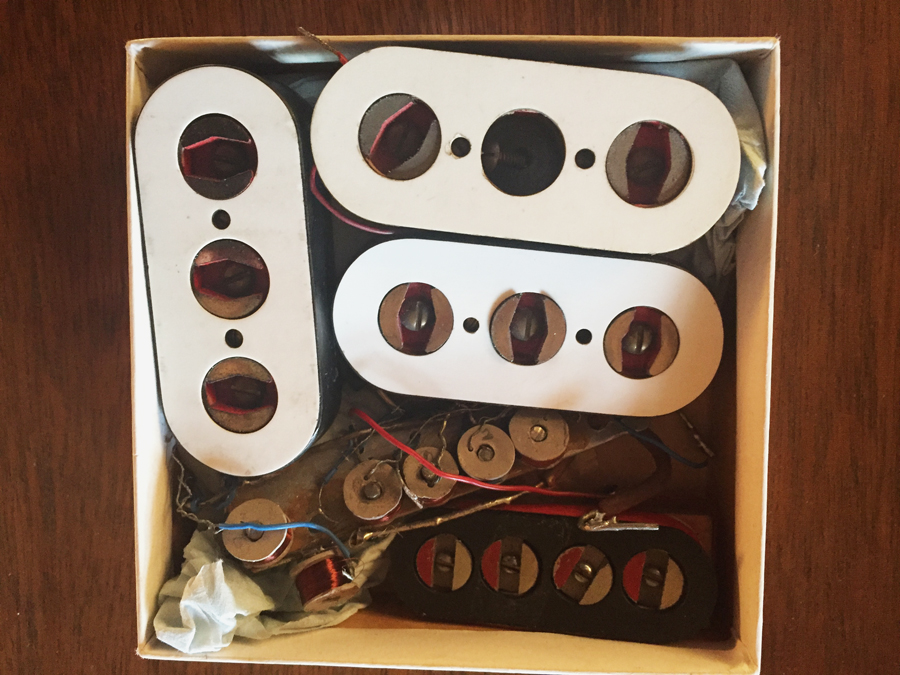
The preworn Tri-Sonics covers from the Live Aid-period prop. Image (c) Guyton Guitars

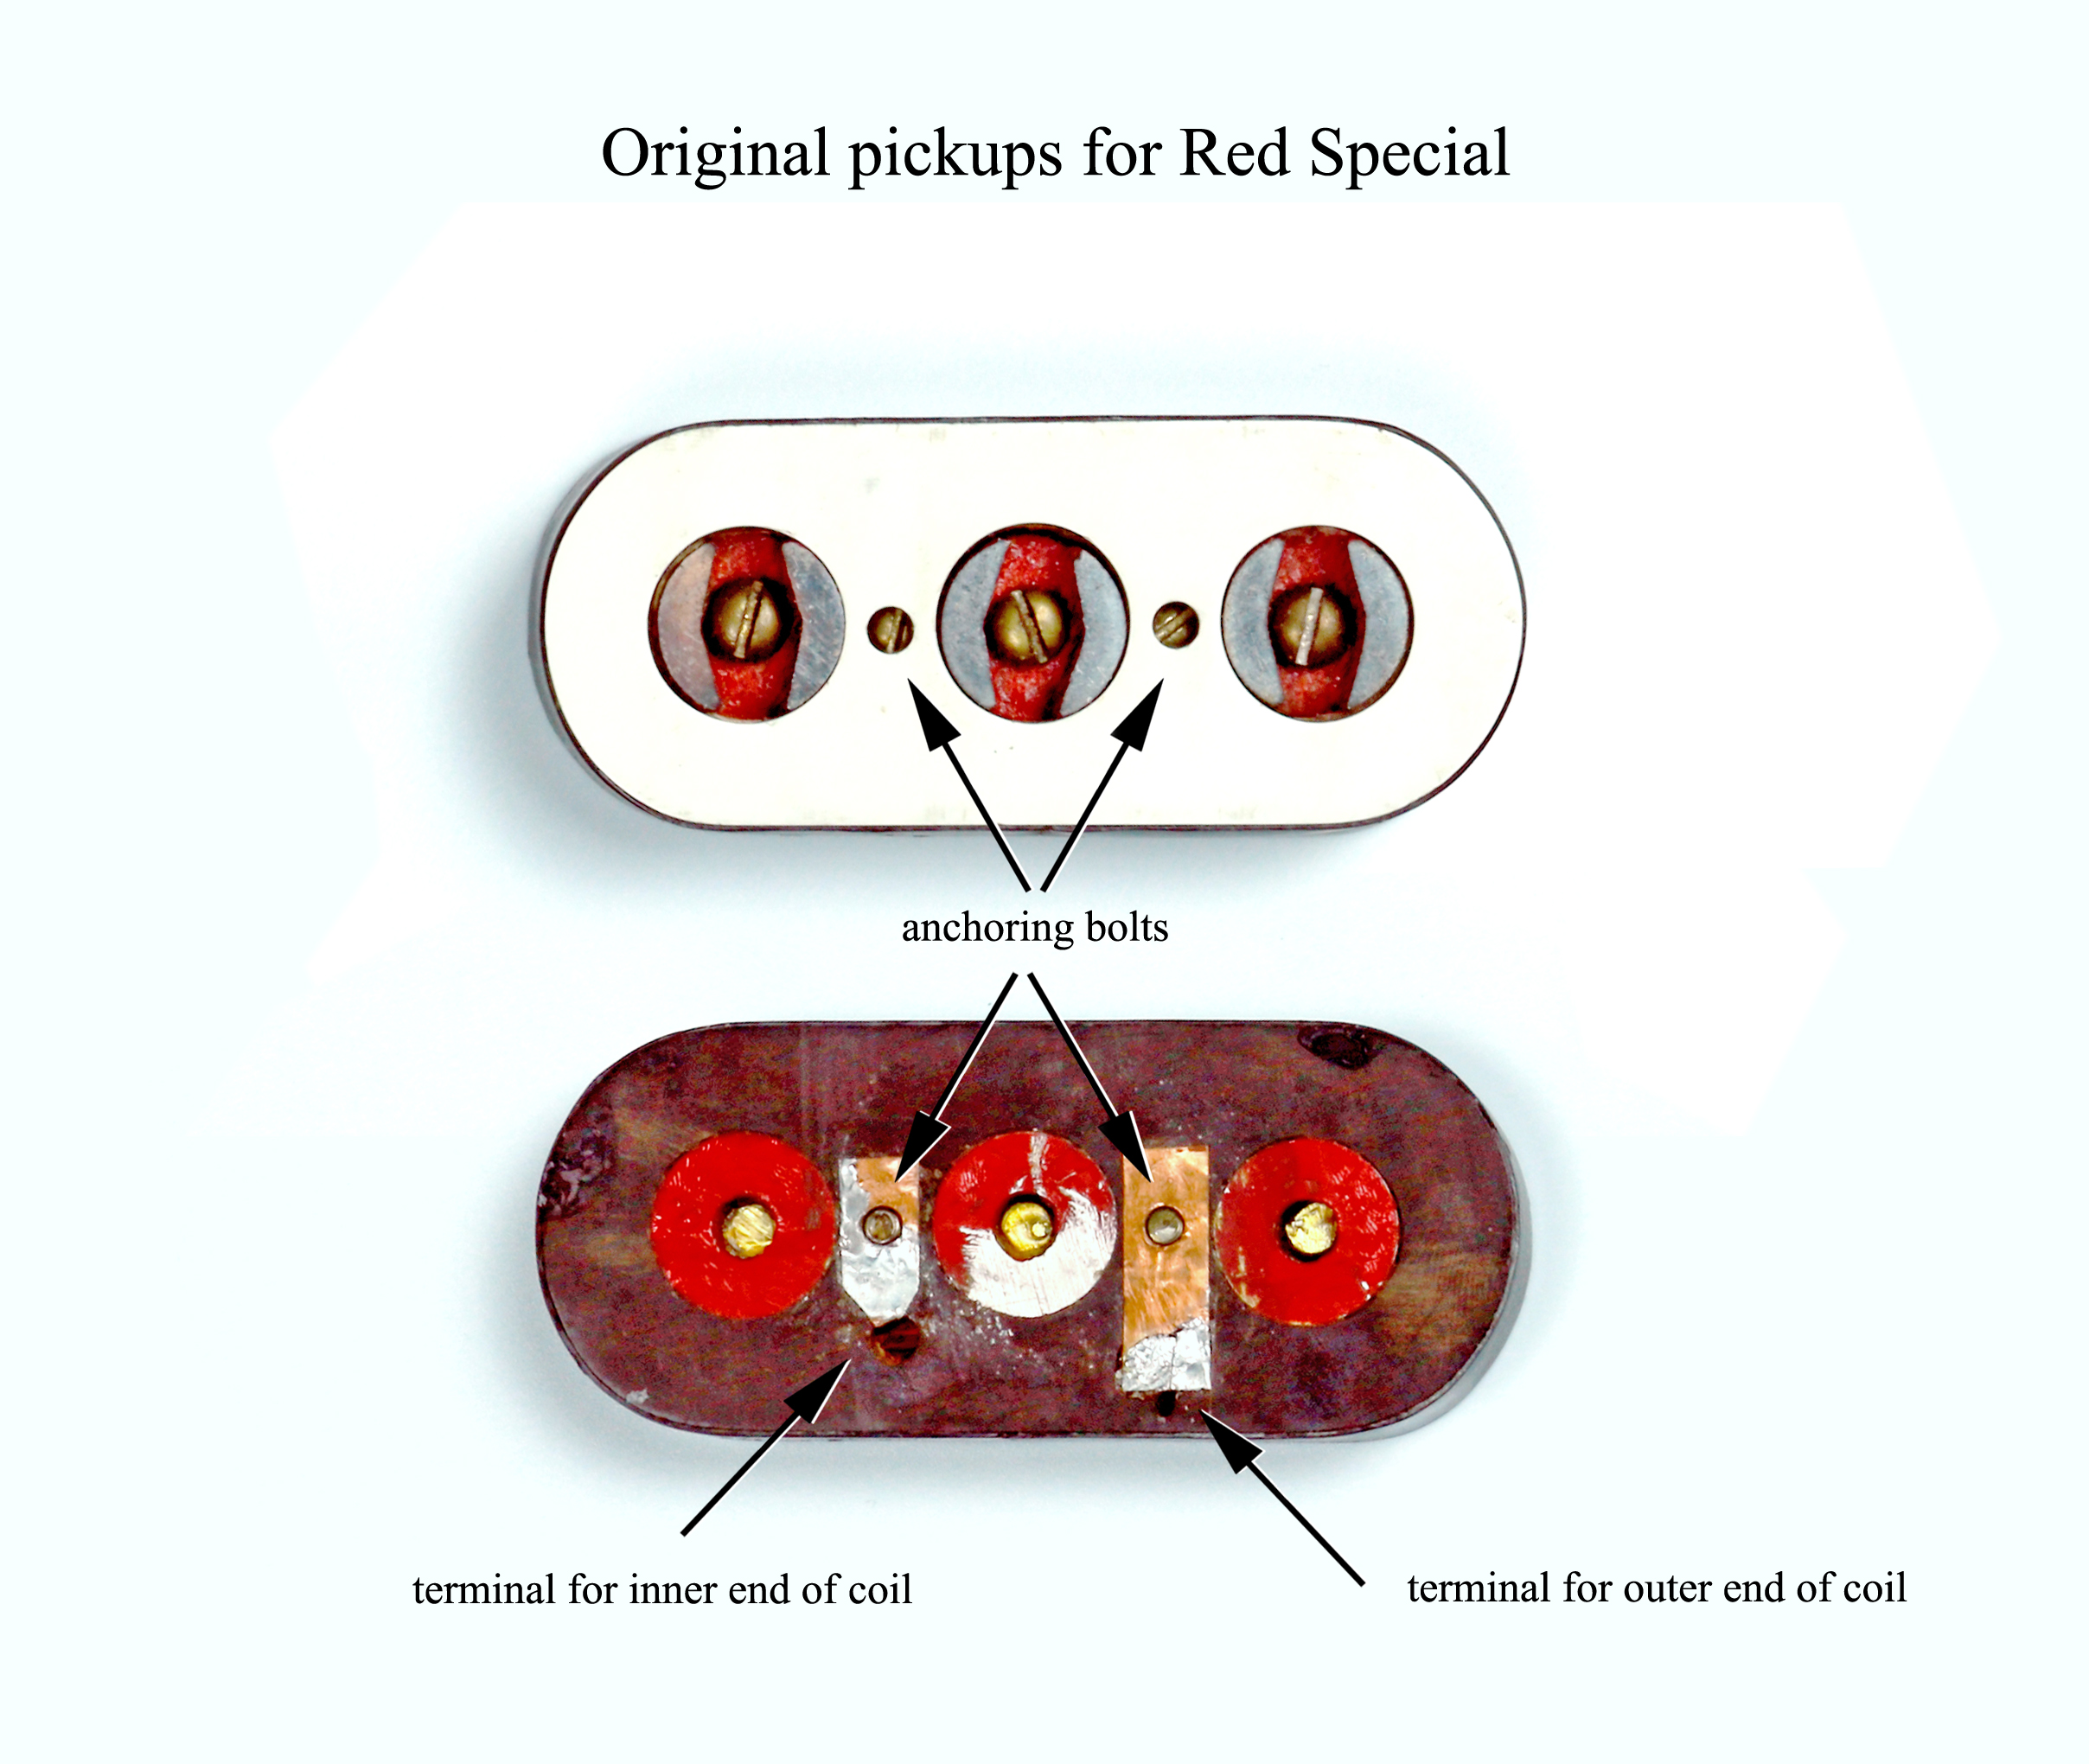
RS.com: The pickups look good. Where did you source those?

AG: Adrian Turner supplied the covers, which were pre-worn. There aren’t any coils inside so the pieces of rubber [visible through the holes in the covers] are kept in place with layers of plywood. The only reason we didn’t get them working was that we just didn’t have time to get some pickups wound.

The tip of the vibrato arm from the Live Aid-period prop. Pic (c) Guyton Guitars

RS.com: You’ve told us that ageing the tip of the vibrato arm was tricky too…

AG: Well, it’s modern plastic so it’s a bit of a toughie because it’s difficult to stain and it’s made to be UV-stable too. I used some concentrated stains but if you use it too much it just tends to come off: it was a tough one.

RS.com: But do they actually function as guitars?

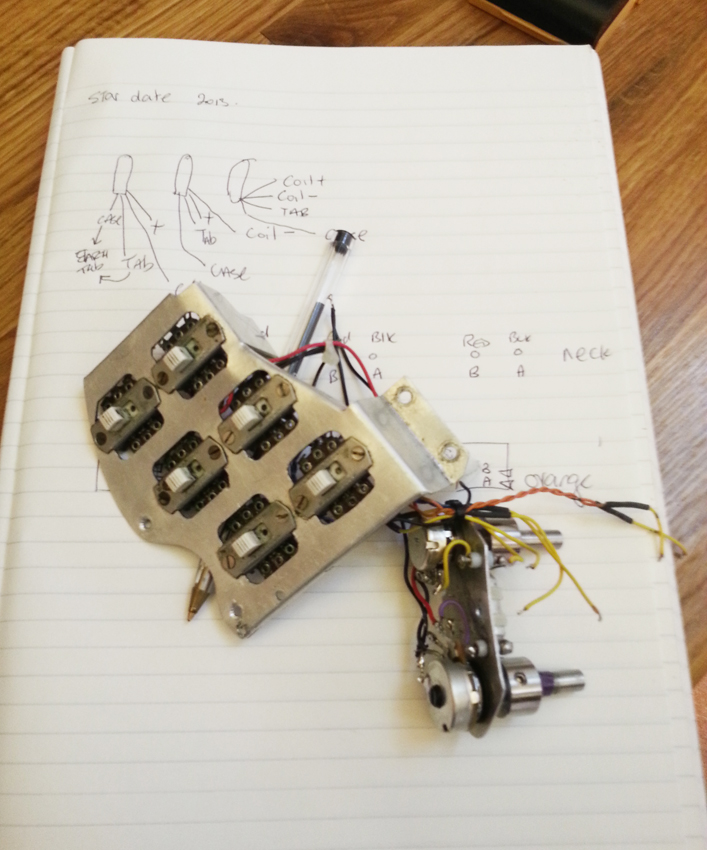
AG: They’re dummies but everything works mechanically – the switches move, the volume and tone pots move and the pickups are there – but there’d be no sound if you were to actually plug them in; nothing’s wired up. There’s no truss rod either and we tried to think of every way, not to cut corners as such, but to save time.

BM: And they do play, they’re proper guitars. I don’t know what we’ll do with them, maybe something for charity. That’d be nice.

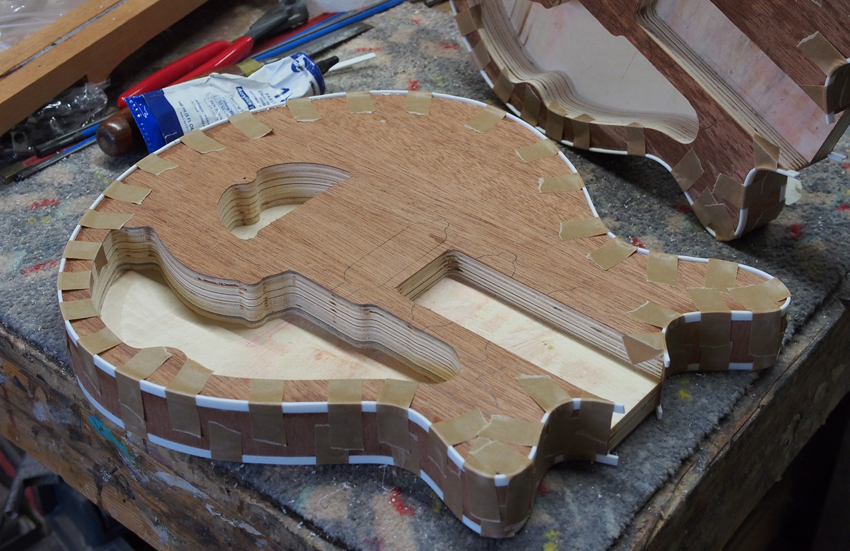
Both prop bodies with their binding being attached. Image (c) Guyton Guitars

Keep an eye on Andrew’s website http://www.guytonguitars.com/ as, when he gets the time in his hectic schedule, he’ll post a gallery featuring many more great shots of both prop guitars.

Filed Under: News

Brian May Interview: The Red Special’s Original Pickups

5th January 2018 By Simon Bradley

As part of an interview with Brian May that was published in the UK by The Guitar Magazine on 1st December 2017, one that first announced to the world that the Red Special’s original pickups had been found, we asked him to talk – in hitherto unrivalled depth – about the pickups, their design and what ultimately led them to be replaced by the now iconic trio of Burns Tri-Sonic single coils.

Part of the following interview forms sections of the feature published in TGM and we’re grateful to them for allowing us to publish this content in full.

The interview was conducted by Simon Bradley in October 2017

Simon Bradley: It must feel strange having the pickups back in your hands again…

Brian May: Yeah, I was worried that we couldn’t find them: it was one of those things that eats away at you in odd moments. But it’s great that Pete found them and here they are, which makes me very happy. Looking at them, it reminds me of a lot of stuff. They were, of course, original features of the guitar and they did work really well.

Pic (c) Pete Malandrone/Queen Productions

SB: We’ve spoken about this before, but please remind us of how you approached their design and construction

BM: I figured out that the principle behind a pickup must be that you have a coil or wire around some magnets that create a magnetic field and when the string vibrates within that magnetic field it causes a change in the flux that links the coil, as a physicist would describe it. When you change the flux you get an EMF generated in the coil, which effectively makes a current, and that’s what you amplify to make the guitar electrified. I was clear about the principle so I bought some little Eclipse button magnets from a place in Kingston (upon-Thames), screwed them to a block and put a former around them and I wound, I think, 50 gauge copper wire around them. Me and my dad made a little winder to do that, and you have to be incredibly careful with 50 gauge wire; it’s like a human hair and you can’t stress it or else your whole coil is ruined. So we wound as many turns as we could get around these pickups. Then there’s a piece of plasticard around the outside and it’s all buttoned up really neatly.

Image (c) Queen Productions

SB: And you worked out a way of fitting them into the guitar without using solder

BM: Now, that’s another invention that I never pursued. Most pickups that you buy have a couple of wires hanging out of it and you have to solder those wires onto some part of the guitar. So, my little invention was that, instead of doing that, the wires are terminated not only on little brass tabs that are built into the pickup itself, but they’re also built in around the two screws that fix it to the body. So, when you put these pickups on the guitar you don’t have to do any wiring; they’re automatically wired into the system. It’s quite a neat way of doing things as it means you can interchange pickups really quickly and easily without doing any wiring changes. I was quite proud of that!

Red Special Unclothed

Pic (c) Simon Bradley/TheRedSpecial.com

SB: Could you describe the sound problems you experienced when using them?

BM: I remember they had an amazing top end to them, but there was one flaw, yes. I wanted to bend strings and when you bend strings with this pickup in place, it picked up the sound OK but added in was this strange sort of shuffling noise a bit like the sound of striking a match on the side of a matchbox. That obviously got in the way and it wasn’t practical to use them. Now, my theory at the time was that instead of having all north poles at the top of the pickup I had alternately north/south, north/south, north/south and what I wanted to do was cut those magnets in half so I could put all norths on one pickup and all souths on another. Unfortunately I never had the opportunity to do that as I didn’t have the equipment. It’s incredibly hard what they make the magnets out of, some kind of special steel I think, and I didn’t have anything that could touch them: it’d take all the teeth off a hack saw.

Pic (c) Pete Malandrone/Queen Productions

SB: Why did you opt for three apertures rather than the more customary six? It’s strange that they bear a passing resemblance to Tri-Sonics…

BM: Well, it has to be three apertures because only three magnets can go in there. They’re button shaped, with both a north and south sticking up, so it had to be three apertures rather than six. I thought that, as the polepieces are equally spaced, it would make a nice, even magnetic field but actually it doesn’t because I think what happens is the north pole, which is next to the south pole of the next one in line, draws the field in very close, which it shouldn’t: the field should really be going outwards to meet the strings. So something happens when the string hits that intense field, but I’m not sure.

BM: So, looking at them now, I’m thinking that it’d be nice to revisit and do that, cut them in half, put them back in so that all the norths are in a line and see what kind of noise the pickups make.

SB: What made you come up with the white covers? They’re quite striking

BM: I just had this white Formica and I liked the look of it. I thought they looked quite attractive at the beginning and I think the idea that you weren’t hiding the pickups, that you were making them a highlight, appealed to me. Strangely enough I didn’t really like the way they looked afterwards and I remember that when I got the photos back from Putney I sort of painted the whiteness out, thinking that they looked not very cool!

SB: You’ve told me that you have some recordings of them somewhere…

BM: Actually, I do know where they are…

SB: That’s great news! How did you go about amplifying and recording the guitar back then?

BM: In those days I used a preamp that I would plug this straight into the amplifier which served our Collaro two-track, but reversible, tape recorder. The recorder had three speed settings, 15, 7½ and 3¾ inches per second, and what happened was that if you slowed the speed down you’d lose all your top end. This happens because it becomes very inefficient so when I switched from 15 to 3¾ you’d have to compensate. The preamp had three different positions for the three speeds and if you run at 3¾ there’s a massive amount of top end being added on: it’s like a really violent EQ and that’s what I liked. That’s the precursor to the treble booster that I’ve used ever since I met Rory Gallagher.

Image (c) Brian May Archive

BM: So, I’d plug the guitar into that preamp, put in on 3¾ so it’d give me the top boost, come out of that and straight into my dad’s homemade amplifier that served our record player, tape recorder, radio and everything else. So that was my little system and I remember cranking it up and my mum getting very anxious about the neighbours, but it had a real sizzle to it and that was the sound I wanted to get onstage. Again, what stopped that happening was that bending the strings didn’t work, but it had a great low end and, because of this EQ, a great top end as well.

SB: And what speakers would you have been using?

BM: I think it was just a Wharfdale speaker in a cabinet that my dad had made.

SB: Maybe you could fit the pickups onto a guitar? Maybe a Guyton or BMG Super?

BM: They had a particular sound to them and I am now wondering if we should go back and look at what they brought to the guitar. Strangely enough they would still fit onto the original guitar because the tabs that would mate with the tabs on the pickups are still there, so it could be done.

(c) Brian May Archive

Filed Under: News

Red Special – Large image #1

22nd December 2017 By Simon Bradley

Filed Under: News

The Red Special – New Picture #15

21st December 2017 By Simon Bradley

(c) Simon Bradley/TheRedSpecial.com

This is the last of the new pictures we’ll be sharing – at least for now.

Here’s the Red Special in all its unmistakable glory, shot in 2013. Since then it’s been around the world several times, has melted the faces of hundred of thousands of rabid punters and has enjoyed a complete overhaul courtesy of Andrew Guyton. It still plays beautifully and sounds as good as ever it did.

Not bad for something designed and built from scratch in suburban Middlesex during the mid sixties!

Happy Xmas!

By all means share this photo, but please credit The Red Special.com should you do so.

Filed Under: News

The Red Special – New Picture #14

15th December 2017 By Simon Bradley

A nice shot down the length of the neck and fingerboard. Note that the coin affixed to the headlock by Brian himself is actually a Brian May ‘Maydusa’ sixpence, not a genuine example of that old English coin. The original machineheads wore out long ago and have been replaced on several occasions. These are the widely-available locking Schaller M6 tuners with pearloid buttons.

(c) Simon Bradley/TheRedSpecial.com

We can see the pitted nature of the frets too and, as is well known these days, the Red Special has never been refretted during its long and eventful life even though, in conventional terms at least, it could really do with it!

By all means share this photo, but please credit The Red Special.com should you do so.

Happy Xmas!

Filed Under: News

The Red Special – New Picture #13

11th November 2017 By Simon Bradley

Not much explanation required here…

(c) Simon Bradley/TheRedSpecial.com

As Brian told Simon for the book ‘Brian May’s Red Special’, he wound a further three of these pickups from scratch and by hand with the intention of fitting them to the Red Special. However, issues with the polarity of the magnets and how they interacted with the strings as he bent them across the pickups led to the purchase of a trio of Burns Tri-Sonics single coils. And lo, with the revelation of the wonders of the Vox AC30 a mere five years away, a tone was born.

By all means share this photo, but please credit The Red Special.com should you do so.

Don’t miss Simon’s six-part blog that goes behind the scenes of the book in much more detail

For part one click here
For part two click here
For part three click here
For part four click here
For part five click here
For part six click here

Filed Under: News

The Red Special – New Picture #12

30th August 2017 By Simon Bradley

Here’s the switch array plus the volume and tone pots resting on the note book of Nigel Knight. As well as experience and confidence, the trick with successfully undertaking such a daunting task as dismantling the Red Special lies with taking notes, and lots of them.

(c) Simon Bradley/TheRedSpecial.com

After the shoot, the guitar was successfully rewired, rebuilt, and restrung, and all pickup selections worked first time.

By all means share this photo, but please credit The Red Special.com should you do so.

Don’t miss Simon’s six-part blog that goes behind the scenes of the book in much more detail

For part one click here
For part two click here
For part three click here
For part four click here
For part five click here
For part six click here

Filed Under: News

The Red Special – New Picture #11

18th May 2017 By Simon Bradley

A truly wonderful picture of the Red Special’s component parts. Brian has given us his permission to share this image, circa August 1963, that sees the body, neck and fingerboard prior to colouring, staining and finishing.

Picture (c) Brian May Archive

The join between the two layers of blockboard that comprise the body are clearly visible, as is the oak insert. There’s no binding as yet either, and we can see two of the screws (one to the right of the pickups and another behind where the bridge and vibrato would be sited) that hold the wooden ‘sandwich’ together.

There are the woodworm holes in the mahogany neck that Brian would fill with pieces of matchsticks, and the fingerboard sports hand-drawn marks where the mother-of-pearl buttons and frets would go: they’re not all there yet, though! We can also see two of the original three pickups plus the guitar’s first set of machineheads.

“The storage device to the left of he pickups is something I bought at one of the second hand shops in London.” Brian told us in the Red Special book. “It’s probably some kind of mount for something in a submarine, but I put bullraces and a stainless steel tube in it, which was our original design for a low friction tremolo”.

With some of Harold’s radio units also in shot, not mention a home-made power system that somehow includes a Lifebuoy soap box, this proves what a truly scientific project this would be. It’s still amazing to think that Brian would record ‘Keep Yourself Alive’ less than a decade later and a legend – to say the least – was born.

54 years later, he’s still using the guitar and it all started with this pieces.

========================================================================

By all means share these photos, but please credit The Red Special.com should you do so.

Don’t miss Simon’s six-part blog that goes behind the scenes of the book in much more detail

For part one click here
For part two click here
For part three click here
For part four click here
For part five click here
For part six click here

Filed Under: News

The Red Special – New Picture #10

11th May 2017 By Simon Bradley

Two pages taken from Brian’s notebook, detailing parts of the construction process of the Red Special. Written in his own hand just after the guitar was finished (thus dating the original documents to late 1964), it adds yet more detail to the build and are just two of many private papers the team had access to during the research for and compilation of the Brian May’s Red Special book.

These notes also appear on pages 32/33 of the book, but we thought it’d be useful to transcribe the copy into a format that can be more easily read. Needless to say, the book contains many more examples of Brian’s original work, including exquisite pencil drawings of designs for pickups, graphs denoting differing scale lengths, and much more.

========================================================================

<page one>

A – External Body Shaping

A rough idea of the maximum dimensions of the body were decided. A number of sheets of greaseproof paper were sellotaped together and the outline was drawn full size on these sheets in pencil.

With carbon paper the tracing was transferred to the material to be used in two places (and the body was to be double-thickness) and inked in. The strips of the blockboard were made parallel to the neck.

The two laminates were cut out with a fret-saw in a conjunction with a supply of blades. That part fastening the neck in place was provisionally cut straight across, leaving a wide margin for the fretting process.

The two halves were screwed together so that their edges corresponded as closely as possible. The composite edge was more finely shaped by:

1 – Planing with the work protruding over the edge of the table, a method found to be less useful than:

<page two>


2 – Chiselling, with the work placed flat on a hard surface, the chisel being pushed downwards until it hit the surface.

3 – Sandpapering. This was done, again by putting the work flat on a hard surface and using a piece of sandpaper fastened round a cylindrical former. The case of the cylinder was kept pressed against the surface of the bench, so the edge was maintained perpendicular.

The part where the neck was to join was left untouched.

B – External Neck Shaping

The vertical projection of the neck was transferred to the top of the wood in a similar way to the body, taking care to allow enough length for the inclined extreme end of the head. The outline was roughly cut with a tenon saw.

The edges of the actual neck were planed straight, and the straight edges of the head were similarly treated, but the corners were left on for the time being.

The horizontal projection, or elevation, was drawn on the edges.

========================================================================

By all means share these photos, but please credit The Red Special.com should you do so.

Don’t miss Simon’s six-part blog that goes behind the scenes of the book in much more detail

For part one click here
For part two click here
For part three click here
For part four click here
For part five click here
For part six click here

Filed Under: News

The Red Special – New Picture #9

5th May 2017 By Simon Bradley

The tremolo springs that sit in a cavity behind the bridge.

(c) Simon Bradley/TheRedSpecial.com

There was no way of removing the tremolo block and springs without irrevocably damaging the body, so we left them where they were, much as we were itching to see the array in all its glory. The knife-edge design the Mays came up with is still staggering in its foresight, and its action and stability is unsurpassed.

Lots of additional details can be seen here too, including a coin (we suspect it’s a sixpence) sitting under the layer of copper cavity insulation installed by Greg Fryer, five of the six saddle beds and part of the rubber pad upon which the bridge pickup sits.

By all means share this photo, but please credit The Red Special.com should you do so.

Don’t miss Simon’s six-part blog that goes behind the scenes of the book in much more detail

For part one click here
For part two click here
For part three click here
For part four click here
For part five click here
For part six click here

Filed Under: News

  • « Previous Page
  • 1
  • 2
  • 3
  • 4
  • 5
  • Next Page »

ORDER HERE

Links

  • London Stereoscopic Company
  • LSC Shop
  • BrianMay.com
  • Brian May Guitars
  • Facebook
  • Instagram
  • Twitter
  • YouTube

Copyright © 2026 Brian May | Privacy Policy ... Design by Fingerprint Digital Media