The Red Special

The Story Of The Home Made Guitar That Rocked Queen And The World

  • Home
  • Book Info
  • News
  • Press

The Red Special – New Picture #12

30th August 2017 By Simon Bradley

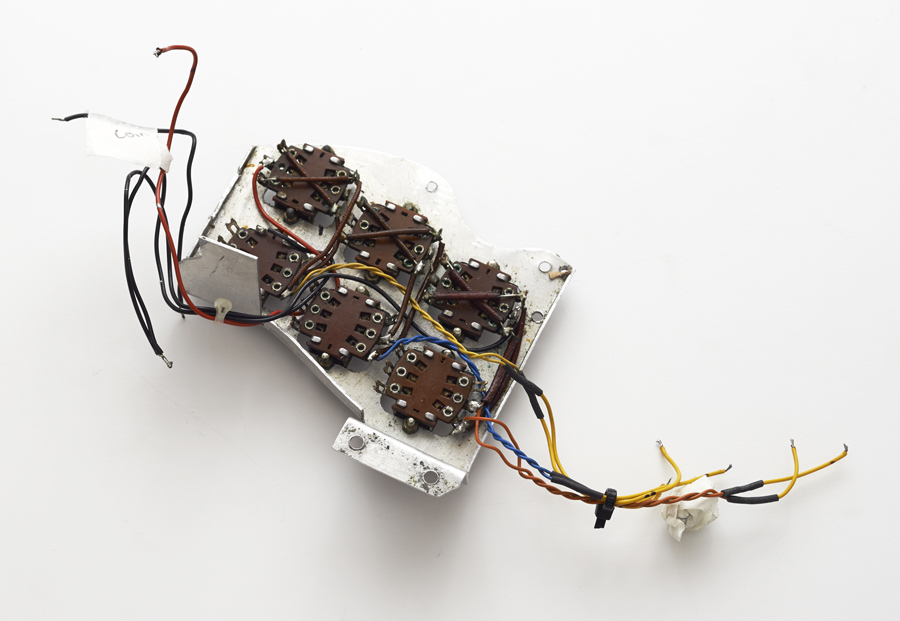
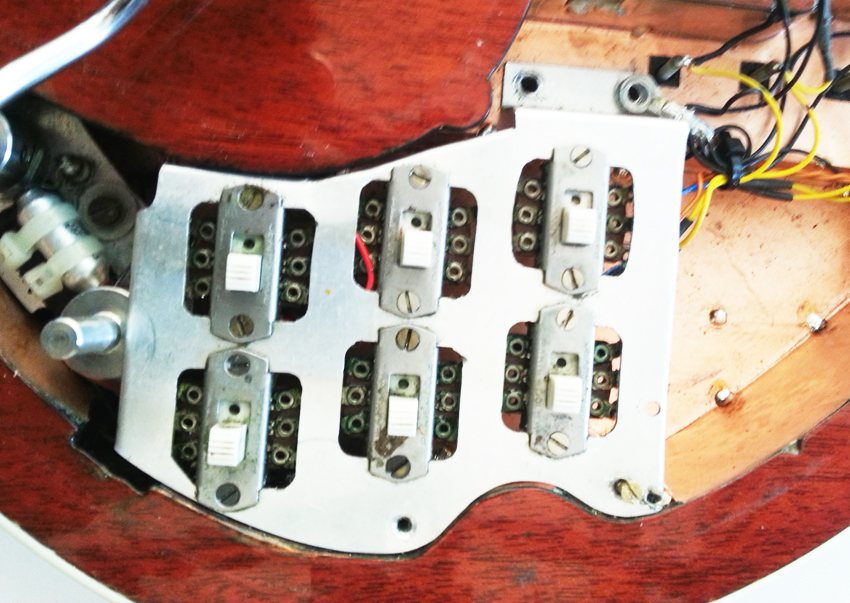
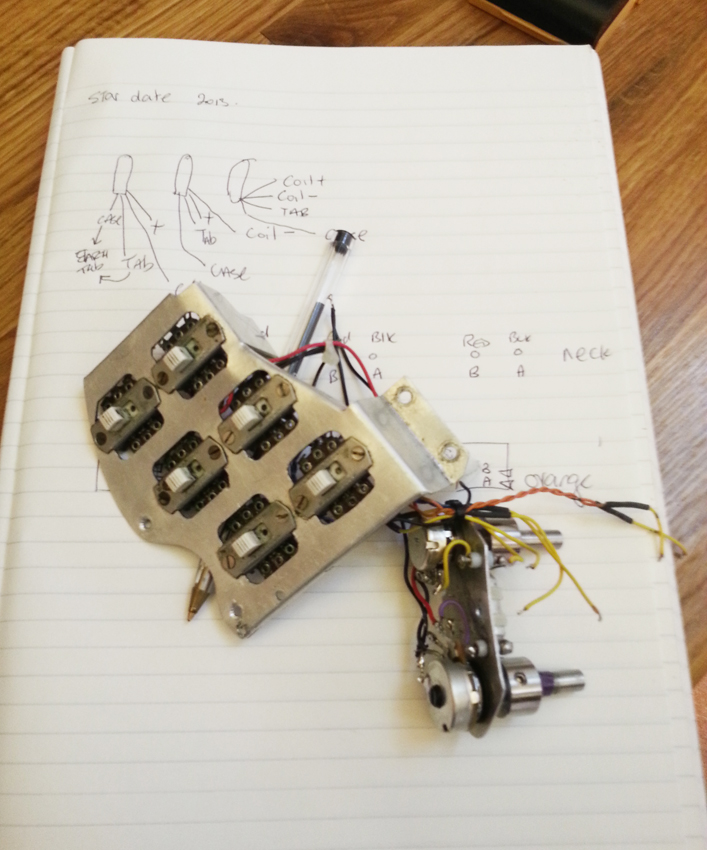
Here’s the switch array plus the volume and tone pots resting on the note book of Nigel Knight. As well as experience and confidence, the trick with successfully undertaking such a daunting task as dismantling the Red Special lies with taking notes, and lots of them.

(c) Simon Bradley/TheRedSpecial.com

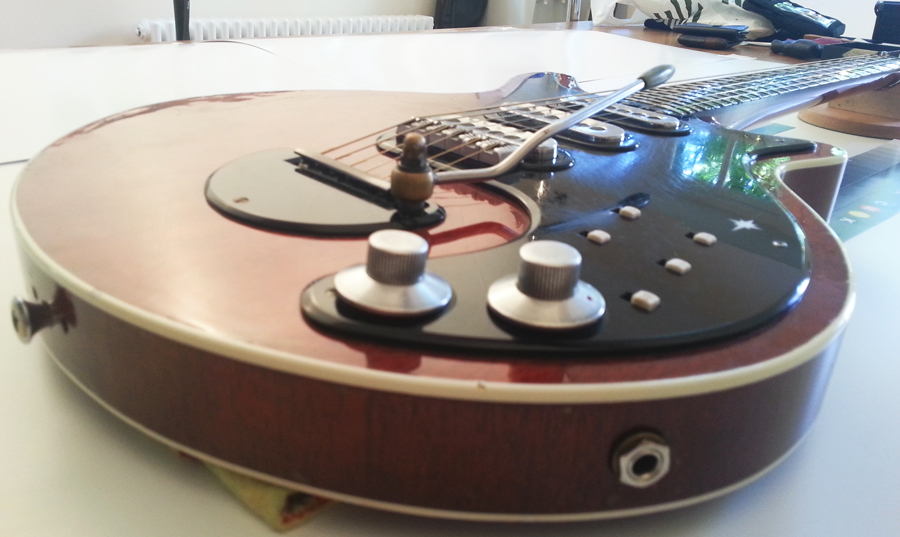
After the shoot, the guitar was successfully rewired, rebuilt, and restrung, and all pickup selections worked first time.

By all means share this photo, but please credit The Red Special.com should you do so.

Don’t miss Simon’s six-part blog that goes behind the scenes of the book in much more detail

For part one click here
For part two click here
For part three click here
For part four click here
For part five click here
For part six click here

Filed Under: News

The Red Special – New Picture #11

18th May 2017 By Simon Bradley

A truly wonderful picture of the Red Special’s component parts. Brian has given us his permission to share this image, circa August 1963, that sees the body, neck and fingerboard prior to colouring, staining and finishing.

Picture (c) Brian May Archive

The join between the two layers of blockboard that comprise the body are clearly visible, as is the oak insert. There’s no binding as yet either, and we can see two of the screws (one to the right of the pickups and another behind where the bridge and vibrato would be sited) that hold the wooden ‘sandwich’ together.

There are the woodworm holes in the mahogany neck that Brian would fill with pieces of matchsticks, and the fingerboard sports hand-drawn marks where the mother-of-pearl buttons and frets would go: they’re not all there yet, though! We can also see two of the original three pickups plus the guitar’s first set of machineheads.

“The storage device to the left of he pickups is something I bought at one of the second hand shops in London.” Brian told us in the Red Special book. “It’s probably some kind of mount for something in a submarine, but I put bullraces and a stainless steel tube in it, which was our original design for a low friction tremolo”.

With some of Harold’s radio units also in shot, not mention a home-made power system that somehow includes a Lifebuoy soap box, this proves what a truly scientific project this would be. It’s still amazing to think that Brian would record ‘Keep Yourself Alive’ less than a decade later and a legend – to say the least – was born.

54 years later, he’s still using the guitar and it all started with this pieces.

========================================================================

By all means share these photos, but please credit The Red Special.com should you do so.

Don’t miss Simon’s six-part blog that goes behind the scenes of the book in much more detail

For part one click here
For part two click here
For part three click here
For part four click here
For part five click here
For part six click here

Filed Under: News

The Red Special – New Picture #10

11th May 2017 By Simon Bradley

Two pages taken from Brian’s notebook, detailing parts of the construction process of the Red Special. Written in his own hand just after the guitar was finished (thus dating the original documents to late 1964), it adds yet more detail to the build and are just two of many private papers the team had access to during the research for and compilation of the Brian May’s Red Special book.

These notes also appear on pages 32/33 of the book, but we thought it’d be useful to transcribe the copy into a format that can be more easily read. Needless to say, the book contains many more examples of Brian’s original work, including exquisite pencil drawings of designs for pickups, graphs denoting differing scale lengths, and much more.

========================================================================

<page one>

A – External Body Shaping

A rough idea of the maximum dimensions of the body were decided. A number of sheets of greaseproof paper were sellotaped together and the outline was drawn full size on these sheets in pencil.

With carbon paper the tracing was transferred to the material to be used in two places (and the body was to be double-thickness) and inked in. The strips of the blockboard were made parallel to the neck.

The two laminates were cut out with a fret-saw in a conjunction with a supply of blades. That part fastening the neck in place was provisionally cut straight across, leaving a wide margin for the fretting process.

The two halves were screwed together so that their edges corresponded as closely as possible. The composite edge was more finely shaped by:

1 – Planing with the work protruding over the edge of the table, a method found to be less useful than:

<page two>


2 – Chiselling, with the work placed flat on a hard surface, the chisel being pushed downwards until it hit the surface.

3 – Sandpapering. This was done, again by putting the work flat on a hard surface and using a piece of sandpaper fastened round a cylindrical former. The case of the cylinder was kept pressed against the surface of the bench, so the edge was maintained perpendicular.

The part where the neck was to join was left untouched.

B – External Neck Shaping

The vertical projection of the neck was transferred to the top of the wood in a similar way to the body, taking care to allow enough length for the inclined extreme end of the head. The outline was roughly cut with a tenon saw.

The edges of the actual neck were planed straight, and the straight edges of the head were similarly treated, but the corners were left on for the time being.

The horizontal projection, or elevation, was drawn on the edges.

========================================================================

By all means share these photos, but please credit The Red Special.com should you do so.

Don’t miss Simon’s six-part blog that goes behind the scenes of the book in much more detail

For part one click here
For part two click here
For part three click here
For part four click here
For part five click here
For part six click here

Filed Under: News

The Red Special – New Picture #9

5th May 2017 By Simon Bradley

The tremolo springs that sit in a cavity behind the bridge.

(c) Simon Bradley/TheRedSpecial.com

There was no way of removing the tremolo block and springs without irrevocably damaging the body, so we left them where they were, much as we were itching to see the array in all its glory. The knife-edge design the Mays came up with is still staggering in its foresight, and its action and stability is unsurpassed.

Lots of additional details can be seen here too, including a coin (we suspect it’s a sixpence) sitting under the layer of copper cavity insulation installed by Greg Fryer, five of the six saddle beds and part of the rubber pad upon which the bridge pickup sits.

By all means share this photo, but please credit The Red Special.com should you do so.

Don’t miss Simon’s six-part blog that goes behind the scenes of the book in much more detail

For part one click here
For part two click here
For part three click here
For part four click here
For part five click here
For part six click here

Filed Under: News

The Red Special – New Picture #8

16th April 2017 By Simon Bradley

(c) Simon Bradley/TheRedSpecial.com

The underside of the six switches, still in their original metal frame as built by Brian. The top row of switches as pictured here (the bottom row when the frame is within the Red Special, of course) reverse the phase of each pickup, as the wiring clearly shows.

The number of tones that this deceptively simple configuration gives is incredible and it’s interesting that no other commercially available guitar possesses anything like it, the myriad Red Special-style guitars notwithstanding.

By all means share this photo, but please credit The Red Special.com should you do so.

Don’t miss Simon’s six-part blog that goes behind the scenes of the book in much more detail

For part one click here
For part two click here
For part three click here
For part four click here
For part five click here
For part six click here

Filed Under: News

The Red Special – New Picture #7

1st April 2017 By Simon Bradley


Pic (c) Simon Bradley/Red Special.com

A cool shot from the book’s launch party. Here, the Red Special nestles up to the guitar Brian received on his seventh birthday in 1954, his Egmond acoustic. The latter is looking especially fine thanks to a flawless restoration job by Andrew Guyton, while the Red Special is comfortable in the fact that it’s a significantly louder beast altogether…

Brian played at the launch party and used three Vox VBM1 amps driven, as ever, by a treble booster. The Fryer Touring model he used can be seen on top of the flight case to the left, while an amp splitter sits just behind the Red Special’s headstock.

By all means share this photo, but please credit The Red Special.com should you do so.

Don’t miss Simon’s six-part blog that goes behind the scenes of the book in much more detail

For part one click here
For part two click here
For part three click here
For part four click here
For part five click here
For part six click here

Filed Under: News

The Red Special – New Picture #6

23rd March 2017 By Simon Bradley

The Red Special – New Picture #6

(c) Simon Bradley/TheRedSpecial.com

An attractive shot of the Red Special prior to her dismantling. Particularly of interest here is the bolt holding the tremolo arm and the original knobs. Notice, too, how flush the white switch tops are to the scratchplate; it does take dexterity to make pickup changes during the heat of a gig, be it Live Aid or down the Red Lion.

The original jack input has long been replaced with this high-quality Switchcraft unit, but the black perspex plates remain from the original build.

By all means share this photo, but please credit The Red Special.com should you do so.

Don’t miss Simon’s six-part blog that goes behind the scenes of the book in much more detail

For part one click here
For part two click here
For part three click here
For part four click here
For part five click here
For part six click here

Filed Under: News

The Red Special – New Picture #5

9th March 2017 By Simon Bradley

The Red Special – New Picture #5

(c) Simon Bradley/TheRedSpecial.com

The metal frame and sextet of pickup switches, laid bare upon the removal of the Red Special’s scratchplate. The frame and switches are the originals, but some of the wiring, not to mention the tone pot that’s just in view here, have been replaced several times over the course of the guitar’s life.

Apologies for the out-of-focussness too…

By all means share this photo, but please credit The Red Special.com should you do so.

Don’t miss Simon’s six-part blog that goes behind the scenes of the book in much more detail

For part one click here
For part two click here
For part three click here
For part four click here
For part five click here
For part six click here

Filed Under: News

The Red Special – New Picture #4

1st March 2017 By Simon Bradley

Here’s a shot of the set that was built by Pete Malandrone for what we hope is a forthcoming video of part of the interview with Brian conducted by Simon Bradley for the ‘Brian May’s Red Special’ book. Watch this space for news on that as we get it – might be a little while, though.

(c) Simon Bradley/TheRedSpecial.com

Parts of the set are modern props but some are genuine, such as the original workbench upon which Brian and Harold May set to work on the Red Special, Harold’s original hammer and, hiding beneath the copies of the original plans for the Red Special, the pickup winder he built with which Brian made his own coils.

Also of serious interest are the radio sets also built by Harold and the original tin of Rustin’s clear coating used on the Red Special’s body.

By all means share this photo, but please credit The Red Special.com should you do so.

Don’t miss Simon’s six-part blog that goes behind the scenes of the book in much more detail

For part one click here
For part two click here
For part three click here
For part four click here
For part five click here
For part six click here

Filed Under: News, Uncategorised

The Red Special – New Picture #3

9th February 2017 By Simon Bradley

Some more relics that were considered for inclusion in the book ‘Brian May’s Red Special’.

Click on the picture to enlarge.

(c) Simon Bradley/TheRedSpecial.com

(c) Simon Bradley/TheRedSpecial.com

The small brown box just below the glass is labelled ‘Bri’s Continuity Tester c. 1959’, while just to the left of the laptop is a plastic bag labelled ‘Red wooden dot taken from Red Special – 5th fret marker’ on 15th January 1998, presumably by Greg Fryer.

There’s also a box of homemade tools including the ‘template for fretboard curvature’, a collection of pickup surrounds, some modern Burns bass Tri-Sonics and a further box of screws and wires that were replaced on 3rd June 1998 during repairs, again, we presume, by Greg Fryer.

By all means share this photo, but please credit The Red Special.com should you do so.

Don’t miss Simon’s six-part blog that goes behind the scenes of the book in much more detail

For part one click here
For part two click here
For part three click here
For part four click here
For part five click here
For part six click here

Filed Under: News

  • « Previous Page
  • 1
  • 2
  • 3
  • 4
  • 5
  • 6
  • Next Page »

Links

  • London Stereoscopic Company
  • LSC Shop
  • BrianMay.com
  • Brian May Guitars
  • Facebook
  • Instagram
  • Twitter
  • YouTube

Copyright © 2026 Brian May | Privacy Policy ... Design by Fingerprint Digital Media